

Introduction
In this tutorial, you will learn the basics of NumPy Arrays from creating and working with NumPy Arrays to Indexing, Slicing, performing operations, joining and splitting of arrays. But first up we have a question that
What is NumPy?
NumPy is an open-source fundamental library for data science with Python. It stands for ‘Numerical Python’. NumPy was developed by Travis Oliphant in 2005. It is what you can say is a sequel to Numeric and Numarray. It’s a fast and powerful library for working with multidimensional arrays and matrices. As it provides a large number of functions to work with those arrays.
It is generally used in Data Science along with Python Pandas and Matplotlib.
NumPy is a really fast library and it is easy and fun to use as compared to Lists or Tuples. We’ll get into those details later in this tutorial. If you are new to NumPy then make sure to read the whole article as we are going to cover all important functions of NumPy extensively. We’ll try to be as concise as possible and this article will be everything you will ever need for NumPy.
Prerequisites
You should have a basic understanding of python 3. You must have a basic understanding of working with lists and slicing.
The Audience
Beginners: This tutorial is made for beginners so that they can learn NumPy Arrays from scratch up to a standard level. We have only covered the handy and the necessary functions in this tutorial. We tried to avoid any advanced stuff but if you do encounter something that you do not understand please do not hesitate to ask in the comment section. There are some sections that you might find confusing if you are just starting up but you will get the hang of it with some practice.
TIP: Open your Python IDE and try the in-between code examples that are in this tutorial as you read the topic. And, instead of copy-pasting and checking the output, type the code yourself for better understanding. It will help you a lot, I mean a LOT!
People with Basic NumPy Experience: This tutorial can be a solid recap of all the necessary things you need to know or already know about NumPy. Do not read all the stuff, just take a quick look at the table of content and read whatever you might find interesting.
Setting Up
Numpy doesn’t come preinstalled with the default python install. Now there are some specifically designed programs for data science with python that make the processing faster so you might want to consider them as well.
Choosing the IDE(Integrated Development Environment)
- Anaconda
- Jupyter Notebook
- PyCharm
- Default IDLE
People tend to use Anaconda with Jupyter Notebook(It comes pre-installed with Anaconda) because it’s way faster than the default IDLE and it’s simple to use. I would not recommend the use of Jupyter Notebook alone, so if you are going for Jupyter Notebook then install Anaconda or Miniconda at least. But for the sake of simplicity, we will stick to idle. You can use any ide as the procedure will be similar in all of them.
My Recommendations: Sublime Text
Sublime Text is a fast and lightweight text editor plus its color schemes make it a much better choice than using any of the other IDE’s. Besides Sublime Text, I also recommend Visual Studio Code. Visual Studio Code is lighter than the original Visual Studio and it has all the functions which you’ll be needing.
Installing Numpy in Preferred IDE
To install Numpy on idle just open pip and type in the following command.
pip install numpy
That’s pretty much it. This will install the latest stable version of numpy available on your default python install.
Numpy comes pre-installed with Anaconda.
But if you are planning to work in a virtual environment then you have to install NumPy separately for that environment. Installing in a virtual environment is also the same as installing in a new python install. You have to use pip.
Working with Numpy Arrays
Arrays are the arrangement of data in tabular form i.e., in the form of rows and columns.
The Syntax(For Beginners)
As per the recommended sign convention, numpy package is imported as
import numpy as np
That’s just the basic sign convention that you’ll see almost everywhere where NumPy is used.
Now the most common function of the numpy package is array. Array takes a number of parameters as an input.
np.array(object, dtype = None, copy = True, order = None, subok = False, ndmin = 0)
It can seem overwhelming at first because of all those parameters but let me tell you one thing that not all of them are necessary for working with arrays. In fact, except for the object parameter, everything else is optional. We’ll talk briefly about each of them now:
- Object: It is the sequence you want to pass into an array.
- dtype: The data type of the resultant array.
- copy: By default it is true. It returns an array copy of the given object.
- order: C (row-major) or F (column-major) or A (any) (default). For better understanding check out this answer on StackOverflow
- subok: It is used to make a subclass of the base array. By default it is turned off, so, the output array is the base array.
- ndmin: Specifies the minimum dimensions of the final array
Now, for example, if you want to use arrays, you can use it like
>>>import numpy as np
>>>np.array([1,2,3])
array([1,2,3])
The Output will be
array([1,2,3])
In this example, we passed a list as an object into the array function and the output will be an array because the copy function is set to True by default.
You can also pass a nested list,tuple or dictionary into an array
Also if you want to import just a single function of that package you can do that as:
>>>from numpy import array
>>>array([1,2,3])
This way you only import a particular function of that package and not the whole package.
This is generally avoided because it makes the code confusing as you may not be able to find from what package or module is it imported from. Also if you have already made a function with this name it then it makes the code even more confusing.
Creating NumPy Arrays
There are many functions that are specifically used to create arrays. We will discuss all the important ones in this article
np.array()
This is the standard function to create array in numpy. You pass a list or tuple as an object and the array is ready. We have already discussed the syntax above.
np.arange()
It is similar to the range() function of python. It runs through particular values one by one and appends to make an array.
np.arange(start,end,stride)
start: the starting number is optional to enter as it is 0 by default.
end: this is the ending number to which an array will run. Remember that array will run till end-1 element.
stride: it is the number of steps you want to skip.
>>>np.arange(1, 10, 3)
The Output will be
array([1, 4, 7])
In the above example, the starting position is 1, ending is 10 and the stride is 3. Therefore, it will run till 9 and prints every third element.
np.zeros()
This helps to create a quick array of zeros of specified order.
>>>np.zeros((3,3))
The Output will be
array([[0., 0., 0.],
       [0., 0., 0.],
       [0., 0., 0.]])
This is used if you want to create the array to be used later for number storing purposes.
Like for example, if you are making a game then you’d want starting attributes of a character to be zero and increase as it further progresses in the game.
np.ones()
It is same as np.zeros(), it just replaces zeros one ones
>>>np.ones((3,3))
The Output will be
array([[1., 1., 1.],
       [1., 1., 1.],
       [1., 1., 1.]])
np.empty()
It creates an array of garbage content. Its values are random.
>>>np.empty((2,3))
The Output will be
array([[0.65670626, 0.52097334, 0.99831087],
       [0.07280136, 0.4416958 , 0.06185705]])
This is only used because it is faster than np.zeros and np.ones. This is due to the reason that all the values are random and not specified.
np.linspace()
The linspace() function returns an array of evenly spaced numbers. For example
>>>np.linspace(3,9,3)
The Output will be
array([3., 6., 9.])
In the above example, the resultant array contains 3,6 and 9. This is because we made the starting point as 3 and end point as 9 and we want 3 evenly spaced numbers between them. This is simple math, what are 3 evenly spaced numbers between 3 and 9(including both)? They are 3,6 and 9.
More functions of creating arrays
Though we have covered all the important functions which are used to create arrays there are even more of them. You probably won’t be needing any other function for creating arrays but if you are curious about other functions then you can take a look at this page on official SciPy documentation.
NumPy Array Attributes
Numpy arrays have various attributes that can make working with them easier. They help in organizing data in fast and convenient ways. We will be discussing only the most important attributes of the array.
np.array().shape and np.array().reshape()
These attributes helps to determine the order of the array and allow changes in them.
For example,
>>>import numpy as np
>>>cg = np.array([[1,2,3],[1,2,3]])
>>>cg.shape
The Output will be
(2,3)
np.array.shape returns the tuple of the order of the array. You can change its order as
>>>cg.shape = (3,2)
>>>cg
The Output will be
array([[1, 2],
       [3, 1],
       [2, 3]])
Notice that the order of the array changed from 2 rows and 3 columns to 3 rows and 2 columns.
You can also do the same thing using the reshape function. For example:
>>>cg = np.array([[1,2,3],[1,2,3]])
>>>cg.reshape(3,2)
>>>cg
The Output will be
array([[1, 2],
       [3, 1],
       [2, 3]])
Note: We do not use parenthesis with .shape but we do with .reshape(). This is because .shape is an attribute of the array while .reshape() is a function of array.
Below is another example of reshape() function
>>> np.arange(30).reshape(5,6)
The Output will be
array([[ 0,  1,  2,  3,  4,  5],
       [ 6,  7,  8,  9, 10, 11],
       [12, 13, 14, 15, 16, 17],
       [18, 19, 20, 21, 22, 23],
       [24, 25, 26, 27, 28, 29]])
You can also create a 3 dimensional array or greater. Here’s an example:
>>>np.arange(30).reshape(5,2,3)
The Output will be
array([[[ 0,  1,  2],
        [ 3,  4,  5]],

       [[ 6,  7,  8],
        [ 9, 10, 11]],

       [[12, 13, 14],
        [15, 16, 17]],

       [[18, 19, 20],
        [21, 22, 23]],

       [[24, 25, 26],
        [27, 28, 29]]])
Tip: Make sure that the multiplication of the order of an array is equal to the number of elements. Else it will not work. For example, in our previous example, we have 30 elements and the order we defined was (5,2,3) i.e, 5*2*3 = 30.
ndim
This shows the dimension of the data in the array. For example
>>>a = np.array([[1,2,3],[1,2,3]])
>>>a.ndim
The Output will be
2
itemsize
This attribute tells the size of the datatype of the data stored in the array.
>>>a = np.array([[1,2,3],[1,2,3]])
>>>a.itemsize
The Output will be
4
Indexing and Slicing Arrays
Array Slicing is no different than list or string slicing in particular. So, if you are familiar with slicing then you’ll understand it in no time.
1D Arrays
Working with 1D Arrays is very simple. You just have to select the index number and you are done.
cg = np.arange(1,6)
print(cg)
This creates an array of 5 elements from 0 to 4
[1 2 3 4 5]
Now to select an element from it just type cg[element-index]. For example, if you want to select element 3 from it then all you have to do is
cg[2]
The output will be 3. This is because index starts from 0.
Suppose you want to select every element starting from 2 in this array. Then
print(cg[1:])
The Output will be
[2 3 4 5]
2D Arrays
a = np.array([[1,2,3,4,5],[6,7,8,9,10]])
We have created a two dimension array. Look at the image below for better understanding of how it works

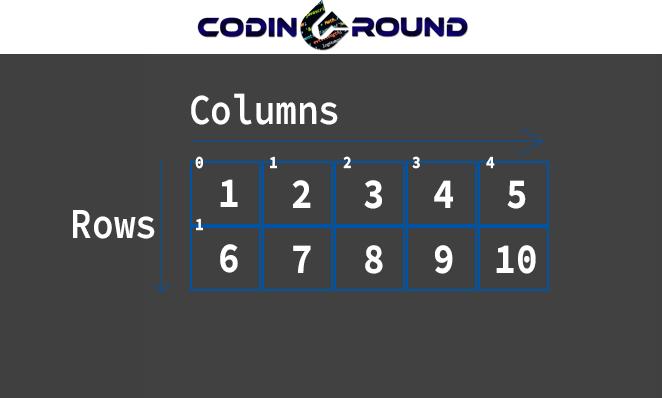
Indexing in 2D array is slightly different than 1D Array. It is written like
cg = np.array([[1,2,3,4,5],[6,7,8,9,10]])
cg[row,column]
So you first have to select the row of the element and then you select its column.
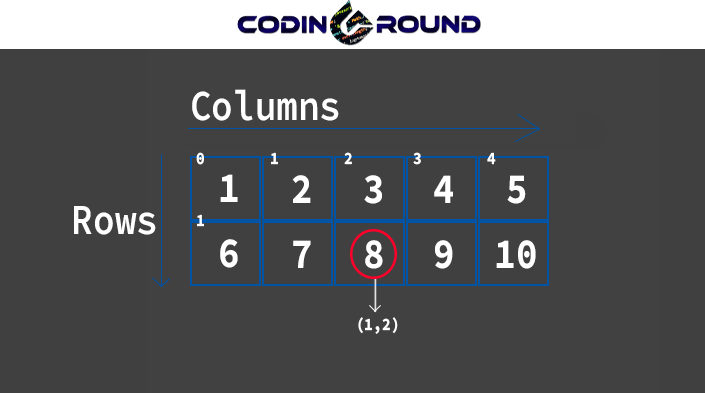
Suppose if you want to select 8 from the array then you first select its row which is 1 since it is in the second. Row and column which is 2 since it is third column
cg = np.arange(1,11).reshape(2,5)
print(cg[1,2])

Now if you want to print all the elements of the first row then you can do this by
a = np.arange(1,11).reshape(2,5)
print(a[0,:]
The Output will be
[1 2 3 4 5]
This is because you selected 1st row which is at index 0 and empty:empty which represents that you select from 0 to end with stride 1. These are default values.
These are the basics of slicing and indexing. There’s a lot to slicing but it’s all practice. You will only understand slicing when you experiment with it.
Joining Arrays
You can also join two or more arrays into a single new array. Let us consider two arrays
a1 = np.array([1,2,3])
a2 = np.array([4,5,6])
In NumPy there’s a function named concatenate() which allows us to join the arrays both horizontally and vertically. Though it must satisfy the condition.
It takes 3 parameters
np.concatenate((sequence),axis,out)
Sequence: The list or tuple of arrays that you want to concatenate.
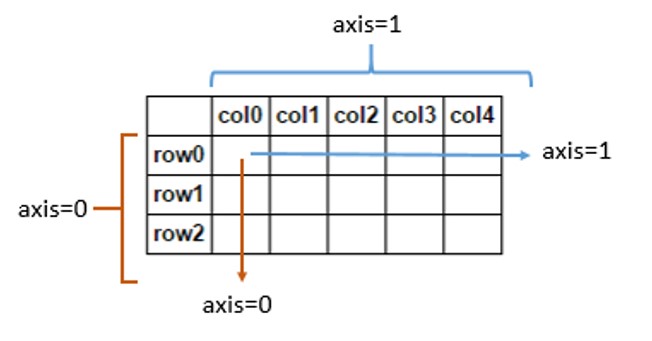
Axis(Optional): How do you want to join? Along rows or columns? By default, the axis is 0 which is rows. To join along with columns, you can change it to axis=1.
Out(Optional): If provided, the destination to place the result. The shape must be correct, matching that of what concatenate would have returned if no out argument were specified.
print(np.concatenate((a1,a2),axis=0))
The Output will be
[1 2 3 4 5 6]
Below is an image which can help you visualize axis

Since it is a 1D Array, you can only join it in one way. If we create a 2D Array, then you will be able to join it along with both rows and columns provided it has the same number of rows or columns.
Joining along axis=0 or vstack()
For example, you cannot join an array which has 1 row with an array which has 2 rows.
 a1 = np.arange(1,11).reshape(2,5)
 a2 = np.arange(11,21).reshape(2,5)
 np.concatenate((a1,a2))
The Output will be
[[ 1,  2,  3,  4,  5],
       [ 6,  7,  8,  9, 10],
       [11, 12, 13, 14, 15],
       [16, 17, 18, 19, 20]]
You can also achieve this by using the vstack() function.
np.vstack((a1,a2))
Joining along axis=1 or hstack()
Further, if you want to join them along with columns then you can change the axis to 1. Since both arrays have the same number of rows, then you can join them along columns
print(np.concatenate((a1,a2),axis=1))
The Output will be
[[ 1  2  3  4  5 11 12 13 14 15]
 [ 6  7  8  9 10 16 17 18 19 20]]
You can also achieve this using the hstack() function.
np.hstack((a1,a2))
In the example, we took only 2 arrays and concatenated them but you can join as many arrays as you want. If you are starting out as a beginner, it will be more than enough for you for now. I’ll be making in-depth tutorials on each of these topics soon.
Splitting Arrays
You can also split an array into two or more arrays and store them differently. There are several functions for splitting arrays too.
The most common of them is the split () function.
split(array, indices_or_sections, axis=0)
Array: The array you want to split
Indices or Sections: Index numbers from which you want to split the array or the number of sections you want your array to split. I would recommend using sections unless it is necessary to use indices.
Axis: By which axis you’d want to split(by default it is 0).
In the case of a 1D array, you don’t really have a choice as to how you want to split it. You can only choose from which element you want to split. Let us consider a 1D array
a = np.arange(4)
Now we have an array of 4 elements. If we want to split it into two then
print(np.split(a,2))
The Output will be
[array([0, 1]), array([2, 3])]
But this function isn’t really much helpful when you are not sure about how much elements you have in array. Because it splits the elements evenly into new arrays.
For example, if you try to split this array into 3 parts then it will throw an error. To prevent that, we have another function named array_split(). Just replace split() with array_split() and it will work fine.
b = np.array_split(a,3)
print(b)
The Output will be
[array([0, 1]), array([2]), array([3])]
You can also store each array into a new variable for example
c = b[0]
d = b[1]
e = b[2]
print(c)
print(d)
print(e)
The Output will be
[0 1]
[2]
[3]
Split() is only used because it is a little faster in comparison to array_split()but it doesn’t make much of a difference in time. I would recommend using array_split() as it reduces the chances of errors.
Splitting along axis=0 or vsplit()
Let us consider a two dimensional array. We will be splitting this array along axis 0 i.e., splitting along rows.
 a1 = np.arange(1,13).reshape(2,6)
b = np.array_split(a1,2)
The Output will be
[array([[1, 2, 3, 4, 5, 6]]), array([[ 7, 8, 9, 10, 11, 12]])]
You can also achieve this by using the vsplit() function.
np.vsplit(a1,2)
Splitting along axis=1 or hsplit()
If you want to split them along with columns then you can change the axis to 1.
b = np.array_split(a1,2,axis=1)
print(b)
The Output will be
[array([[1, 2, 3],
       [7, 8, 9]]), array([[ 4,  5,  6],
       [10, 11, 12]])]
You can also achieve this using the hsplit() function.
np.hsplit(a1,2)
In the above example, we only split a 2D array but you can also split arrays of higher dimensions. Since it will increase the complexity to an intermediate level, we are not going to include that in this tutorial.
Comparison: Arrays, Lists and Tuples
1. Vectorized Operations: One of the main differences between Arrays, Lists, and Tuples is vectorized operations. Only Arrays allow vectorized operations i.e. when you apply a function it gets applied to each element of an array and not to array itself.
For example,
>>import numpy as np
>>cg = [1,2,3,4]
>>cg_array = np.array(cg)
>>cg_array += 2
>>cg_array
>>array([3, 4, 5, 6])
If you try the same with list or tuple it will throw a traceback error, for example:
>>>cgt = (1,2,3,4)
>>>cgt += 1
Traceback (most recent call last):
  File "<pyshell#11>", line 1, in <module>
    cgt += 1
TypeError: can only concatenate tuple (not "int") to tuple
2. Data Type Declaration: Arrays need to be declared while list, tuples, and dictionaries, etc. do not need to be declared i.e., if you want to use arrays then you have to declare them using the .array() class while you do not have to do it with lists or tuples.
3. Mutability: Mutability means the ability to be changed. Data inside arrays can be changed while the data in a tuple cannot be changed or modified.
4. Heterogeneous Data: While arrays, lists, and tuples all are used to store data, arrays cannot store heterogeneous data.

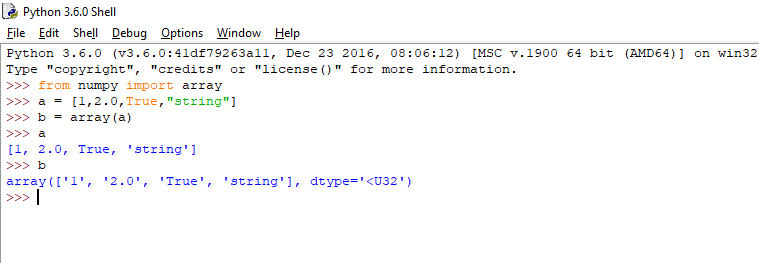
If you observe carefully, the list I passed in array has each element of different data type but when printed as an array, it converted all the data as “string”. This is not the case with lists or tuples.
| Array | List | Tuple | |
|---|---|---|---|
| Vectorized Operations | Yes | No | No |
| Mutability | Yes | Yes | No |
| Pre-Defined Data Type | No | Yes | Yes |
| Heterogeneous Data | No | Yes | Yes |
When and when not to use Arrays?
When to use Arrays:
- You have to store a large amount of data.
- The data you want to store is of the same type.
- You may perform operations on each element.
When not to use Arrays:
- The Data Type is different
- The data is very small
- You do not have to perform operations on each element.
Highlights
First of all, congratulations on making it to the end. Now, this tutorial doesn’t really need a recap as it was kind of an overview so that you can get the hang of it. So I’ll just go through the most important of these functions which are a necessity for using NumPy.
For creating arrays, the most important functions are arange() function and the standard array() function. You may also need zeros() or ones(). I highly doubt that you will be needing any other function.
.shape is the single most important attribute of the array that you should know about. And, for adjusting shapes the .reshape() function may come in handy. It is easier to use than changing arrays shape using shape attribute.
With concatenate() function you will need to specify the axis whereas with hstack() and vstack() you do not need to type the axis. You can use either but using hstack() or vstack() may help in in future to remember the axis.
array_split() adjusts the array split according to the parameters whereas split() will throw an error if the parameters are not proper. So use array_split(). In most cases it’s a win-win.
With array_split() function you will need to specify the axis whereas with hsplit() and vsplit() you do not need to specify the axis.
I guess I have covered everything important. Know that there are some sections where you might get confused if you are a first-timer. Please don’t hesitate to ask in the comments section. I will try to answer each and every comment. So, that’s all.
Happy Coding!