


Introduction
Whether you are building a game or even a simple app with user interaction you need to store the data. There are many methods in Python which are used to store data but by far the most popular one is using MySQL Database. The reason is that it is really easy to use and you can use the SQL file anywhere with any language you like and it is more secure than the others.
What exactly is MySQL?
Databases store the data in tabular form. MySQL is one such Relational Database Management System(RDBMS) for SQL.
Prerequisites
One should have a basic knowledge of both Python and SQL for better understanding.
What’s in this tutorial?
In this tutorial, you will learn how to use MySQL Database with Python. We will make a simple school database consisting of data of students. We’ll store student’s information and retrieve it using Python. So by the end of this tutorial, you will be able to make a full python application that uses MySQL database to store and retrieve data using Python.
Setting Up
MySQL doesn’t come pre-installed with the default windows installation so we’ll need to set it up ourselves. As usual, we’ll be using the default IDLE for python for the sake of simplicity. You can use any IDE.
About MySQL server, you might find it a bit confusing to install and use it if you are a first timer.
So if you are an absolute beginner I’d recommend downloading the command line interface of SQL. Even though it is an older version, it can help you to understand better. You can download it from here.
After installing MySQL now it’s time to install the MySQL driver for Python.
For that we’ll be using python mysql connector.
To install mysql connector just open pip and type
pip install mysql-connector
With this you have everything installed correctly. Now let’s get started with the main thing.
Working With MySQL
Connecting Python with MySQL
Now that we have everything installed, we have to make a connection between your Python file and the MySQL database.
First import the module in your python file as
import mysql.connector
This will import the MySQL Driver in python file. Next up connect your file with server.
mycon = mysql.connector.connect(
host="localhost",
user="username",
passwd="password"
)
Where username and password are defined by you. Generally both of them are root.
Now that you’ve established the connection with the server, all you have to do is execute the database commands.
Creating Database
Let us create a database named school. Since my username and password is root, I’ll be using that.
import mysql.connector

#Establishing Connection with MySQL Server
conn = mysql.connector.connect(
    host = "localhost",
    user = "root",
    password = "root"
)
cursor = conn.cursor()
cursor.execute("CREATE DATABASE School")
Now open the MySQL Interface, and type show databases; and you will find the school database listed.


Creating Tables
Now that we have database set up, we have to create a table and configure it.
Creating a table is almost similar to the way you create a database. We will make a table named student and store his id, name, email id and username.
cursor.execute("USE SCHOOL")
cursor.execute("CREATE TABLE Student(id int primary key auto_increment,name varchar(20) not null,email varchar(30) unique)")
This will create a sample table Student in the School database.

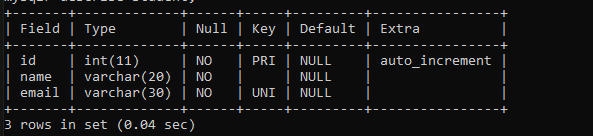
Here we have,
ID – which is kind of a serial number of the registered student. I’ve made it primary key because two students cannot have same serial numbers.
Name – It is the name of the student. Obviously it is a varchar and cannot be null.
Email – It is the email id of the student, it is unique because two students cannot have same email id and they cannot leave it empty.
Now if we ever want to pull specific user data then we can pull it using both id and email since they are unique and will fetch only one result.
Now that we have a table all we need is to make functions for registering and pulling user data.
Storing Data in Tables
First Up, we’ll make a register function
def register():
    name = input("Please Enter Your Name: ")
    query = "SELECT * from Student where email="

    #Checks if the email is already registered
    while True:
    	#Checks if @ is present in email
    	while True:
    		email = input("Enter your email: ")
    		if '@' not in email:
    			print("Invalid Email")
    		else:
    			break
    	tmp_query=query+'"'+email+'"'
    	cursor.execute(tmp_query)
    	result = cursor.fetchall()
    	if len(result) > 0:
    		print("email already registered. Please try again.")
    	else:
    		break
    cmd = "insert into Student(name,email) values (%s,%s)"
    data = (name,email)
    try:
        cursor.execute(cmd,data)
        conn.commit()
        print("Registration Successful")
    except:
        conn.rollback()
        print("Unable to register")
So the code is pretty much self explanatory if you are familiar with python but don’t worry if you are not. We will go through the code
So first we take the student’s name as an input in the name variable then we make a query and store it in the query variable. This is totally optional but it makes string formatting easy to understand.
Now what we did is we applied 2 conditions in the email input. First we check if @ is present in the email because you cannot create an email without @ sign and then we check if the email is already regitered or not.
To retrieve rows from the database we basically have 3 functions.
fetchone() – It fetches the first record that comes up in the query.
fetchmany(number_of_records) – It fetches the specified number of records
fetchall() – It fetches all the records available.
fetchall() and fetchmany() returns a list of tuple whereas fetchone() returns a single tuple. So remember which one you use as it might create error in indexing.
Now after retrieving the records, I stored them into a new variable result and then i checked if the number of records is greater than 0 means there is already one record with that email.
If email is already registered, I prompt user to enter email again as it is already registered using the while loop and breaks if there is no record with that email.
Now there are a lot of ways to check the existence of a particular record but this one just seems to work with me.
In the end, if everything works out fine, I insert the data into the database and commit the data. If by any chance an error occurs, we rollback to previous data.
So, I registered with my name and email as suyash@codinground.com


Quick Tip: While experimenting with the data you might mess up the auto-increment. To reset the auto-increment value run this query:
ALTER TABLE Student AUTO_INCREMENT = Value;
You can also run the alter table commands with python this way but you won’t need them very often. So we are not going to use each and every command here instead let us try to retrieve the user data.
Fetching Data From Tables
It will be similar to storing data since we are going to apply same conditions on email check.
def retrieve_info():
	query = "SELECT * from Student where email="
	while True:
		email = input("Enter your email: ")
		tmp_query=query+'"'+email+'"'
		cursor.execute(tmp_query)
		result = cursor.fetchone()
		if len(result) > 0:
			userid = result[0]
			name = result[1]
			print("User ID:",userid)
			print("Name:",name)
			print("Email:",email)
			break
		else:
			print("Email does not exist")
What we did here is we fetched the whole record belonging to that email. Since there were 3 columns in that record(id, name, and email), therefore I stored them into different variables and displayed. It would look like this.


Closing Connection
After completing the script it is important to close the connection with the database or the user could modify it.
Now closing is done in the same order as establishing the connection. First, we close the cursor and then we close the connection. It is done by using the close() function.
cursor.close()
conn.close()
Full Code
import mysql.connector

#Establishing Connection with MySQL Server
conn = mysql.connector.connect(
    host = "localhost",
    user = "root",
    password = "root"
)
cursor = conn.cursor()
try:
	cursor.execute("CREATE DATABASE SCHOOL")
	cursor.execute("USE SCHOOL")
	cursor.execute("CREATE TABLE Student(id int primary key auto_increment,name varchar(20) not null,email varchar(30) unique not null)")
except:
	cursor.execute("USE SCHOOL")

query = "SELECT * from Student where email="

#Registration Function
def register():
    name = input("Please Enter Your Name: ")

    #Checks if the email is already registered
    while True:
    	#Checks if @ is present in email
    	while True:
    		email = input("Enter your email: ")
    		if '@' not in email:
    			print("Invalid Email")
    		else:
    			break
    	tmp_query=query+'"'+email+'"'
    	cursor.execute(tmp_query)
    	result = cursor.fetchall()
    	if len(result) > 0:
    		print("email already registered. Please try again.")
    	else:
    		break
    cmd = "insert into Student(name,email) values (%s,%s)"
    data = (name,email)
    try:
        cursor.execute(cmd,data)
        conn.commit()
        print("Registration Successful")
    except:
        conn.rollback()
        print("Unable to register")

def retrieve_info():
	query = "SELECT * from Student where email="
	while True:
		email = input("Enter your email: ")
		tmp_query=query+'"'+email+'"'
		cursor.execute(tmp_query)
		result = cursor.fetchone()
		if len(result) > 0:
			userid = result[0]
			name = result[1]
			print("User ID:",userid)
			print("Name:",name)
			print("Email:",email)
			break
		else:
			print("Email does not exist")
while True:
    getorsave = input("1. Register User \n2.Get User Info\n")
    if getorsave == "1":
        register()
        break
    elif getorsave == "2":
        retrieve_info()
        break
    else:
        print("Invalid Input")

#Closing Connection with Database
cursor.close()
conn.close()
I’d like to end this one here. I could literally go on writing on this for hours but this should be enough to get you started.
Now with this you can even build a secure login and registration program. I’ll be showing that in future tutorials. If you have any doubts then don’t hesitate and hit the comment section.
Happy Coding!